

Basic Knots All Fisherpeople Should Know
Basic knots all fisherpeople should know
Knots are often the most intimidating part of learning fly fishing. You’ll find that there are only a few knots that you’ll need to know in order to be a proficient fisherperson. Below are 6 knots that will come in handy out on the water or at home.
Loop-to-Loop Connections
It would be fair to say loop-to-loop connections aren’t even a real knot, they do not require anything but two loops on two different lines.


1st Photo: For this example, pretend the orange loop is your fly line and the blue loop is your leader.
2nd Photo: The orange loop was put through the blue loop.
3rd Photo: The tag end of the blue line (the leader) was placed through the orange loop.
4th Photo: Straighten out both loops and the connection is finished.
Perfection Loop
The perfection loop is great for making loop-to-loop connections. I tie the perfection loop the most when I need to attach a piece of tippet to a sinking line for streamer fishing.


1st Photo: A loop was made with the tag end underneath the rest of the line.
2nd Photo: Take the tag end and make another loop that passes over the first loop and ends with the tag end of the line behind the first loop.
3rd Photo: Now take the tag end and place it in between the first and second loops and keep it pinched there with your thumb and index finger. While keeping the tag end between both loops, grab the second loop and pull it through the first loop.
4th Photo: Continue to tighten the knot by pulling on the second loop. The final result should be a sturdy loop that doesn’t slip or move.
Double Surgeon’s Loop Knot
The double surgeon’s loop knot is often used for attaching backing to the fly line.


1st Photo: Double over a piece of line or backing to create a large loop.
2nd Photo: Create another loop with the doubled-over line as if you were tying a normal overhand knot.
3rd Photo: Pass the loop through the loop just like an overhand knot.
4th Photo: Instead of only once, pass through the loop 2 times.
5th Photo: Pull the primary loop tight and your knot is finished.
Triple Surgeons Knot
The triple surgeon’s knot is very useful for attaching two lines together, specifically attaching the leader to the tippet.


1st Photo: Take two separate pieces of leader material or tippet (they can be different diameters) and place them so that there is a 3-5 inch section where they overlap. In this example pretend that the orange line is the leader and the blue line is the tippet.
2nd Photo: Make a loop with both lines just like you would if you were tying an overhand knot with both lines.
3rd Photo: Pass both lines through the loop 3 times.
4th Photo: 2nd pass through.
5th Photo: Third pass through.
6th Photo: Keep tension on both sides of the knot and pull to tighten.
7th Photo: The final knot should be fairly low profile, always test the knot to make sure the connection is sound.
Clinch Knot
The clinch knot is a tried and true knot for tying on all kinds of flies.


1st Photo: Pass the line through the hook eye and then twist the line 5 - 7 times.
2nd Photo: Take the tag end of the line and pass it through the small loop right before the hook eye.
3rd Photo: This is an optional step that makes the knot slightly stronger. After completing the previous step there should be a new loop that begins at the end of the twisted portion of the line. Pass the tag end through this new loop.
4th Photo: Tighten the knot by pulling the tag end. Make sure the knot is seated well.
5th Photo: The final knot should sit directly on the hook eye.
Non-Slip Loop Knot
Non-slip loop knots are another knot used to tie on flies. It is specifically useful for tying on streamers or any fly that is supposed to move and react to the current.


1st Photo: Start by tying an overhand knot in your leader or tippet and then passing the tag end through the hook eye.
2nd Photo: Pass the tag end through the overhand knot.
3rd Photo: Twist the line 3-7 times. The amount of twists is dependent on the size of the line your using, a smaller line needs more twists.
4th Photo: Take the tag end of the line and pass it through the front side of the overhand knot.
5th Photo: After completing the previous step, a large loop spans from the twisted line to the overhand knot. Pass the tag end through this new loop.
6th Photo: Pull on the tag end to tighten the knot, make sure that it’s seated well. When tied correctly, this knot shouldn’t slip.
Nail Knot
The nail knot is likely the most difficult knot on this list, which is why I like to use a knot tool while tying it. Nail knots are perfect for attaching backing or leader material to fly lines.


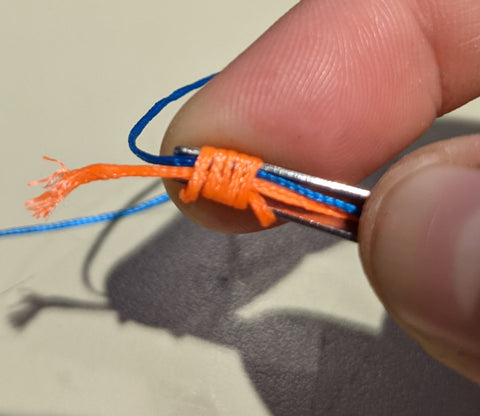

1st Photo: A basic knot tool. For this example, pretend the blue line is the fly line and the orange line is backing or leader material.
2nd Photo: Place the blue line in the tip of the knot tool and hold the tag end with your thumb. Hold the orange line with your thumb and then wrap it around the tip of the nail knot tool 4-5 times.
3rd Photo: Take the tag end of the orange line and pass it underneath the wraps that you just made. This is where the knot tool is nearly essential.
4th Photo: While keeping both lines pinned under your right thumb, quickly pull the orange line so that it slips off the tip of the knot tool and immediately tightens around the blue line.
Knots can be confusing and I’m sure that my descriptions aren’t perfect. Please let us know if you need help tying any of these knots, we’d be happy to show you the ropes in person here at the shop.
